The endless war between your lawn and your garden beds is usually fought with a string trimmer, but there is a permanent way to declare a ceasefire. Grass naturally wants to creep into fertile garden soil, and mulch inevitably washes out onto the grass during heavy rains. The solution is to install a “mowing strip” border. This specific dual-layer brick design creates a physical retaining wall to hold back the garden while providing a flat, stable track for your lawnmower wheels, eliminating the need to trim the edges ever again.
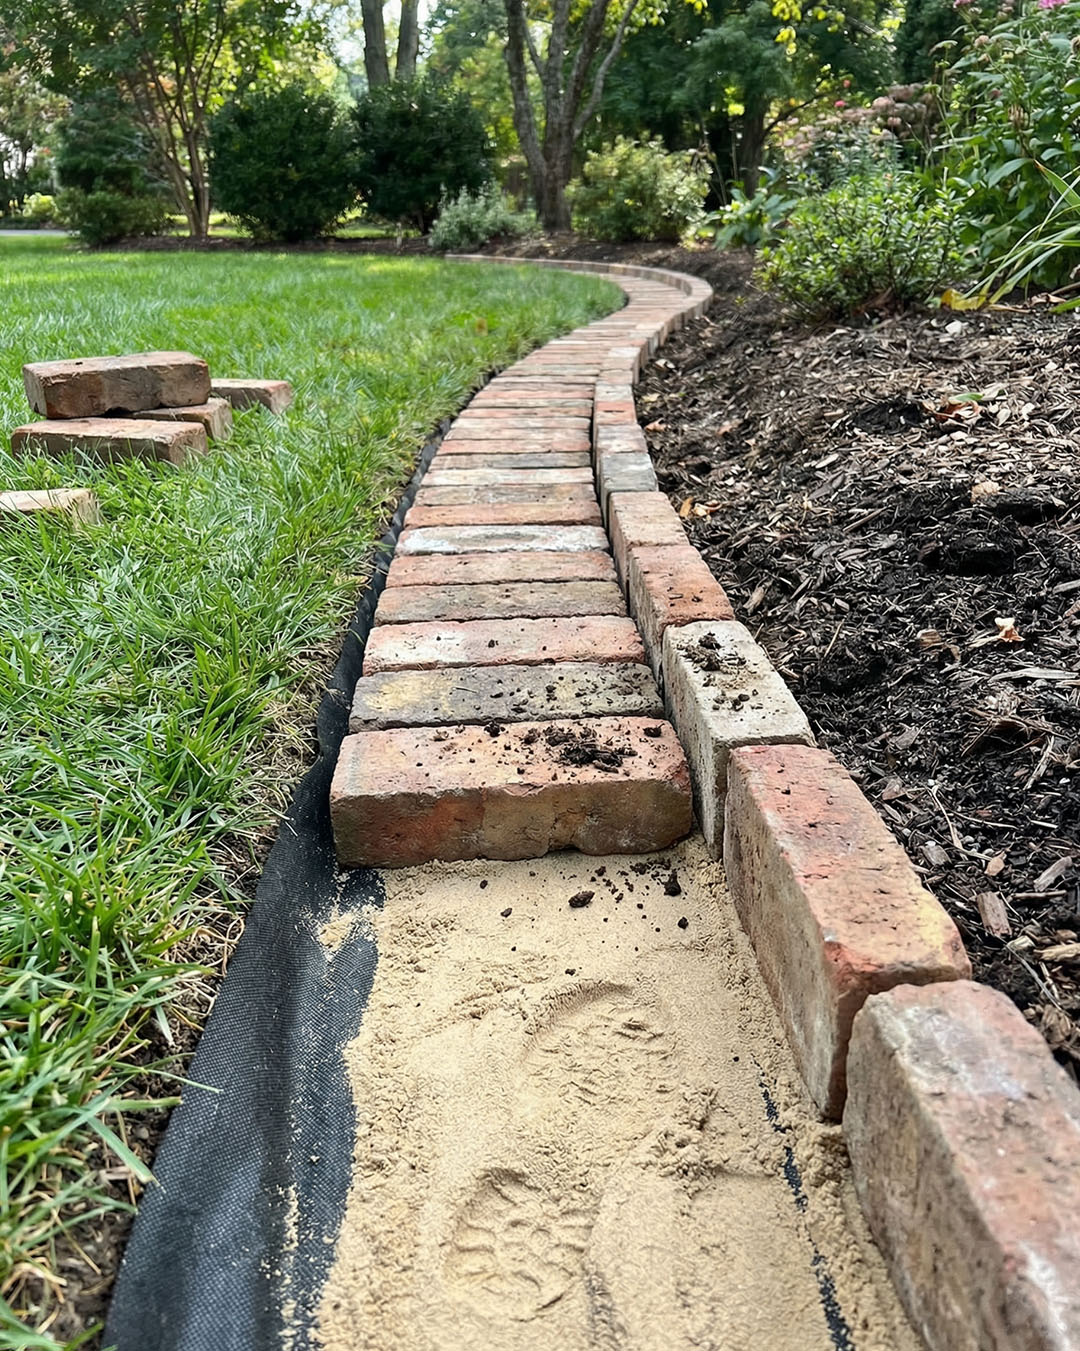
The “Floating” Foundation System The secret to a border that doesn’t sink or heave over time lies in the preparation. You must dig a trench wider than your bricks and line the entire excavation with heavy-duty black landscape fabric. This geotextile layer is non-negotiable; it prevents the bricks from sinking into the mud and stops aggressive weed roots from tunneling up from below. On top of the fabric, spread a smooth, two-inch layer of builder’s sand. This sand bed acts as a cushion, allowing you to easily tap the bricks level with a rubber mallet and providing essential drainage so frost doesn’t heave your hard work out of the ground.
The “L-Shape” Configuration To maximize functionality, use a two-part layout often called a “soldier and runner” pattern. Place one row of bricks vertically (standing on their long, narrow edge) against the garden side. This acts as a mini retaining wall that effectively holds back mulch and soil. Directly in front of that, lay a second row of bricks flat and horizontal, flush with the grass level. This flat row is your “mowing strip.” It creates a hard surface for your mower wheels to ride on, ensuring you cut every blade of grass right up to the wall without ever needing to break out the weed whacker.
Material Selection and Repurposing While this technique looks stunning with classic red clay bricks, you don’t need to buy new materials to get a high-end look. This project is the perfect opportunity to upcycle. Leftover pavers from a patio project or reclaimed bricks from a demolition site often work better than new ones because their weathered patina blends instantly with the landscape. As long as the dimensions are consistent, concrete paver blocks can also be substituted for a more modern, uniform aesthetic.
The “Lock-Down” Finish Once your bricks are laid and leveled, you need to seal the deal to prevent nature from reclaiming the cracks. Do not just sweep regular dirt or plain sand into the joints, as this invites weeds and moss to grow between your bricks. Instead, finish the project by sweeping “polymeric sand” into the crevices. When misted with water, this special sand hardens like flexible concrete. It locks the bricks tightly in place, prevents ants from nesting, and creates an impenetrable barrier that stops grass from growing through the cracks, keeping your border pristine for years.